在设计工具或布局编辑器中,精确对齐元素往往是一项繁琐且容易出错的任务。手动调整位置不仅耗时,还难以保证视觉上的完美对齐。磁吸对齐功能通过自动吸附元素到边界、中心线或其他元素附近,显著提升了操作效率和设计精度。这种交互体验让用户能够专注于创意本身,而非反复微调像素位置。本文将介绍如何使用 HTML、CSS 和 JavaScript 实现一个具备磁吸对齐辅助线的拖拽布局工具。效果演示
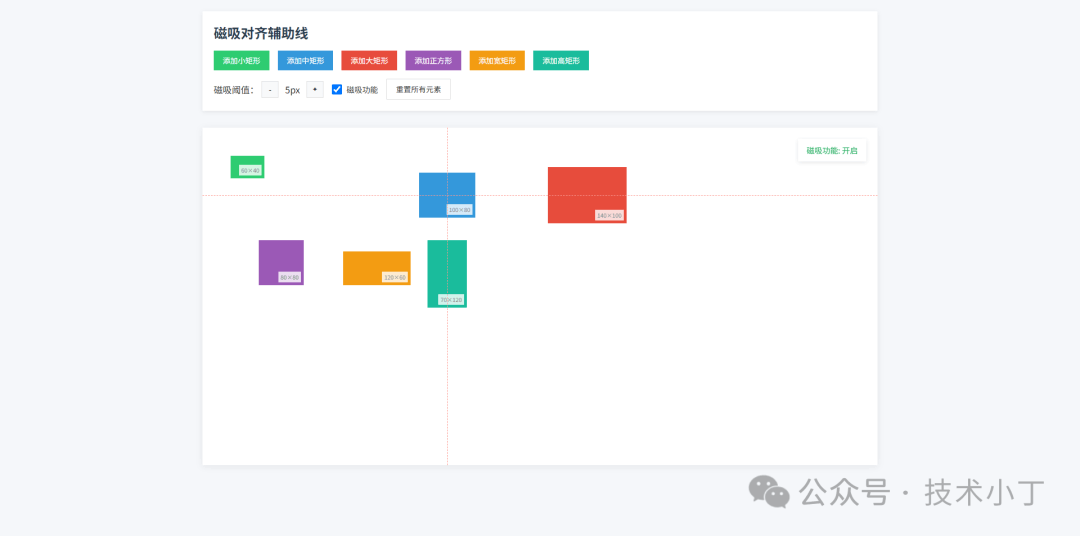
打开页面后,用户可以看到一个白色工作区,默认包含多个不同尺寸的可拖拽矩形元素。点击顶部按钮可以添加更多元素。当用户按下鼠标并拖动某个元素时,元素会跟随光标移动;若靠近其他元素边缘或工作区边界一定距离(默认 5px),则会自动吸附并对齐,同时显示红色虚线辅助线提示对齐方向。用户可以通过“+”和“-”按钮动态调整磁吸阈值,也可关闭磁吸功能以自由拖拽。点击“重置所有元素”按钮可恢复初始状态。
页面结构
头部控制栏
头部控制栏提供了添加元素、设置磁吸参数以及重置功能的操作入口。其中包括六个按钮用于创建不同类型和尺寸的拖拽元素,一个数值调节组件用于设定磁吸敏感度阈值,一个复选框用于启用或禁用磁吸功能,以及一个全局重置按钮。<div class="header"> <h1 class="title">磁吸对齐辅助线</h1> <div class="controls"> <button class="btn btn-small" id="addSmallRect" onclick="createDraggableByType('small')">添加小矩形</button> </div> <div class="controls"> <div class="threshold-controls"> <span>磁吸阈值:</span> <button class="threshold-btn" id="decreaseThreshold" onclick="adjustThreshold(-1)">-</button> <span class="threshold-value" id="thresholdValue">5px</span> <button class="threshold-btn" id="increaseThreshold" onclick="adjustThreshold(1)">+</button> </div> <label> <input type="checkbox" id="toggleMagnetic" checked onchange="toggleMagnetic(this)"> 磁吸功能 </label> <button class="btn btn-reset" id="resetAll" onclick="resetAll()">重置所有元素</button> </div></div>
主工作区
主工作区是一个相对定位的容器,内部放置所有可拖拽元素,并负责绘制磁吸辅助线。右上角的状态面板实时显示当前磁吸功能是否开启,文字颜色随状态变化而切换绿色(开启)或灰色(关闭)。<div class="workspace" id="workspace"> <div class="status active" id="magneticStatus">磁吸功能: 开启</div></div>
核心功能实现
初始化逻辑
程序启动时执行 init() 函数完成基础配置加载。首先更新工作区偏移量以便后续计算绝对坐标,绑定窗口大小改变和滚动事件监听器以适应响应式布局,接着初始化一批预设元素供用户快速开始操作。其中 updateWorkspaceOffset 记录工作区相对于视口的位置信息,防止因页面滚动导致坐标偏差。bindEvents 注册全局事件处理器阻止文本选择干扰拖拽行为。createInitialDraggables 创建若干初始元素填充画布。function init() { updateStatus(); updateWorkspaceOffset(); bindEvents(); createInitialDraggables();}
元素创建机制
createDraggableByType 方法根据指定类型生成新元素。系统预先定义了六种标准尺寸配置存储于 draggableConfig 对象中,每次调用时从中读取宽高数据并在工作区内随机分配安全起始位置避免越界。具体 DOM 构造过程封装在 createDraggable 函数内,它不仅插入节点还附加唯一标识符及尺寸标签方便调试查看。function createDraggableByType(type) { const config = draggableConfig[type]; if (!config) { console.warn(`Unknown draggable type: ${type}`); return; } const maxX = workspace.clientWidth - config.width - config.offset; const maxY = workspace.clientHeight - config.height - config.offset;
const x = Math.max(config.offset, Math.floor(Math.random() * maxX)); const y = Math.max(config.offset, Math.floor(Math.random() * maxY));
const width = config.isSquare ? config.width + Math.floor(Math.random() * 40) : config.width; const height = config.isSquare ? width : config.height;
createDraggable(x, y, width, height, type);}
function createDraggable(x, y, width, height, type = 'medium') {  const id = draggables.length + 1;  const draggable = document.createElement('div');  draggable.className = `draggable ${type}`;  draggable.id = `draggable-${id}`;  draggable.innerHTML = `<div class="size-indicator">${width}×${height}</div>`;  draggable.style.width = `${width}px`;  draggable.style.height = `${height}px`;  draggable.style.left = `${x}px`;  draggable.style.top = `${y}px`;
  workspace.appendChild(draggable);
  const draggableObj = {    element: draggable,    id: id,    x: x,    y: y,    width: width,    height: height,    type: type  };
  draggables.push(draggableObj);  addDragEvents(draggable, draggableObj);  return draggableObj;}
拖拽交互处理
每个新建元素都注册有 mousedown 事件监听器,在触发时刻记录初始偏移并向文档追加 mousemove 和 mouseup 监听器形成完整拖拽周期。为了优化性能减少重复查询开销,采用闭包缓存关键变量如起始坐标和工作区边界信息。实际位移更新发生在全局 mousemove 回调中,这里会判断是否满足磁吸条件进而修正目标坐标值。一旦松开鼠标即销毁临时监听器终止动作循环。function addDragEvents(element, draggableObj) { let offsetX, offsetY; let startX, startY;
const mousedownHandler = (e) => { if (e.button !== 0) return; e.preventDefault();
updateWorkspaceOffset(); const workspaceRect = workspace.getBoundingClientRect(); offsetX = e.clientX - workspaceRect.left - draggableObj.x; offsetY = e.clientY - workspaceRect.top - draggableObj.y; startX = draggableObj.x; startY = draggableObj.y; setActiveElement(draggableObj); element.classList.add('active'); clearGuidelines(); isDragging = true; createGlobalEventListeners(element, draggableObj, offsetX, offsetY); };
element.addEventListener('mousedown', mousedownHandler); draggableObj.mousedownHandler = mousedownHandler;}
磁吸算法
磁吸核心在于 applyMagneticAlignment 函数,其作用是对候选位置做一轮扫描匹配找出最接近的理想停靠点。整个流程可分为三部分:边界吸附、中心线对齐和邻近元素锁定。首先检查是否贴近画布四周边缘,若符合距离阈值则强制拉回至零点或最大可用空间末端,并绘制相应方向的引导线。其次探测水平垂直两条中央轴是否存在交集机会,若有同样执行强制居中策略。if (Math.abs(targetX) <= magneticThreshold) { resultX = 0; createGuideline('vertical', 0);}const workspaceCenterX = workspace.clientWidth / 2;const currentCenterX = targetX + currentObj.width / 2;if (Math.abs(currentCenterX - workspaceCenterX) <= magneticThreshold) { resultX = workspaceCenterX - currentObj.width / 2; createGuideline('vertical', workspaceCenterX);}
最后遍历其余现存对象逐一比较相互间距,包括左右上下四个边以及中心点之间的欧氏距离,任一维度小于等于阈值便触发锁定效应并生成辅助标记帮助用户确认对齐结果。for (const other of nearbyElements) { const otherRight = other.x + other.width; const currentRight = targetX + currentObj.width; if (Math.abs(targetX - other.x) <= magneticThreshold) { resultX = other.x; createGuideline('vertical', other.x); } }
辅助线渲染
每当发现有效吸附关系都会即时调用 createGuideline 动态插入一条临时线条元素到工作区中。为了避免重复绘制同一位置的指引,先查找已有集合是否存在相似项再决定是否继续构建新的 DOM 节点。释放拖拽状态或者关闭磁吸开关时统一清理这些临时可视反馈以免污染界面。function createGuideline(type, position) { const existing = guidelines.find(g => g.type === type && Math.abs(g.position - position) < 2 ); if (existing) return;
const guideline = document.createElement('div'); guideline.className = `guideline ${type}`; if (type === 'horizontal') { guideline.style.top = `${position}px`; guideline.style.left = '0'; } else { guideline.style.left = `${position}px`; guideline.style.top = '0'; } guideline.dataset.position = position; workspace.appendChild(guideline); guidelines.push({ element: guideline, type, position });}
源码地址
阅读原文:原文链接
该文章在 2026/2/4 15:49:50 编辑过


 400 186 1886